If you are exploring image to 3d tools, this comparison explains when a photo works best as a backlit lithophane lamp or as a raised relief, and how lighting should shape your choice.
A lithophane reveals a picture when light passes through changing wall thickness. A raised relief shows its surface under reflected light. The better choice depends less on the photo than on how you want to display the print.
The short version
- Choose a lithophane when the finished piece will sit in front of a window or light. Its bright areas are thin; its dark areas are thick.
- Choose a raised relief when you want a tactile surface that reads under room or side lighting. Image brightness becomes height instead of controlling transmitted light.
- Choose the display before the shape. A lamp wraps the picture into a cylinder; a flat panel suits a frame, hanging loop or stand.
- Neither makes a full sculpture. If the subject needs a back and sides, use a full-object workflow instead.
Decide how the picture should be seen
The useful question is: Will light pass through this print, or fall across it? That determines what the image data needs to control.
For a backlit print, SupaVoxel’s lithophane maker turns a photo into a panel whose thickness changes across the image. More plastic blocks more light, making dark areas; less plastic lets light through, making highlights. Without a light behind it, the print looks like a pale panel with faint bumps. Judge it backlit, not by how dramatic its surface looks on the print bed.
A raised relief works the other way around as an object on display. White areas rise, black areas remain low, and the contours become visible when light strikes the surface. Side lighting helps reveal shallow slopes that flat front lighting can hide.
This distinction matters most with ordinary photos. A face can read well as a lithophane because its light and dark regions become tones. Treat the same brightness values as physical height and a white shirt rises while a dark eye sinks. That may make interesting embossed art, but it does not recover the person’s actual depth. A terrain heightmap or a deliberately prepared grayscale design is a better source when height must mean something specific.
Choose a lamp or panel for a lithophane
I would pick the display location before adjusting the image. A lamp makes sense when the light will sit inside the printed shape. A panel makes sense when you have a window, a light behind a frame, or a shelf position where the print can be lit from the rear.
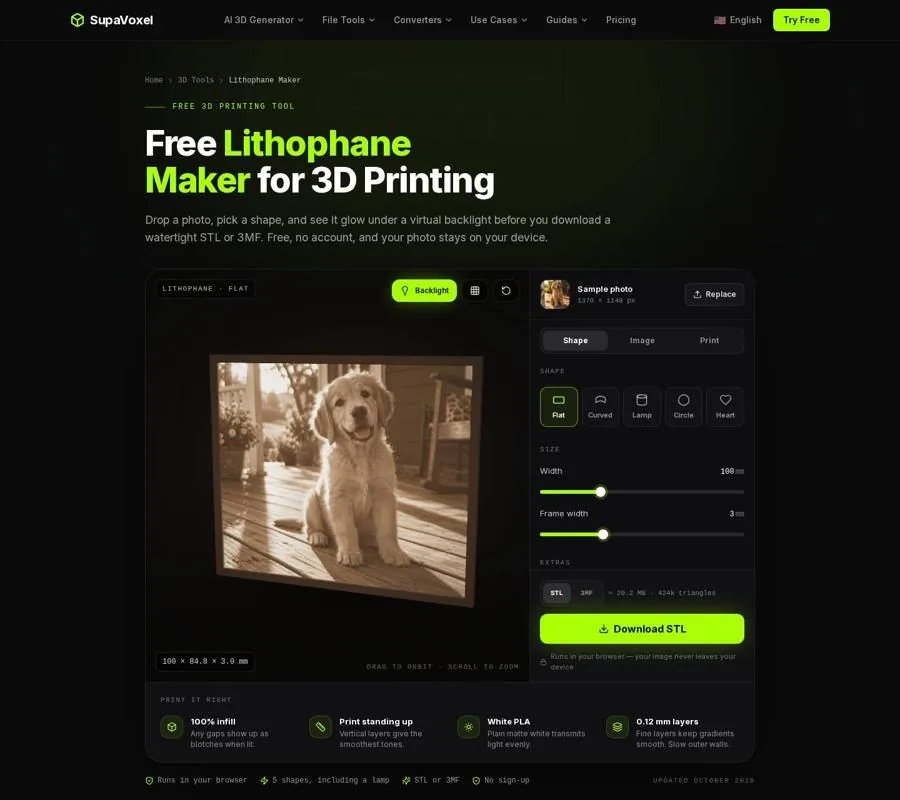
The lithophane maker offers shape controls and a backlit preview, so you can judge the intended display rather than the unlit surface.
- Start with the photograph’s composition. Look for a clear subject and real contrast. Crop out background clutter; a busy backdrop becomes visual noise once every shade is translated into thickness. Use the image controls to adjust brightness, contrast or gamma while watching the backlit preview.
- Match the shape to the setting. Flat is the straightforward panel choice. Curved makes an arc; its angle runs from 30–270°, and wider angles can stand on their own. Lamp wraps the image around a cylinder. Circle and Heart crop the image square automatically, so check that the subject still fits after cropping.
- Check size and edges before export. Panel width runs from 40–250 mm; Lamp circumference can reach 400 mm. A frame can stiffen the panel because it stays at full thickness. The tool also offers a hanging loop and a foot block for a flat panel. Choose those based on how the print will actually sit, not just how it looks in the preview.
The maker exports a closed STL or 3MF standing upright. That orientation is intentional: vertical layers give lithophane tones a smoother appearance than printing the picture lying flat. Its backlit preview is particularly valuable for a lamp, where the image has to remain legible after wrapping around the light.
Build a relief when you want visible height
If the piece should read without a light behind it, use the heightmap to STL converter. It turns grayscale brightness into a raised surface on a solid base. Unlike a lithophane, it is meant to lie flat for printing and to be viewed by light reflecting off its contours.
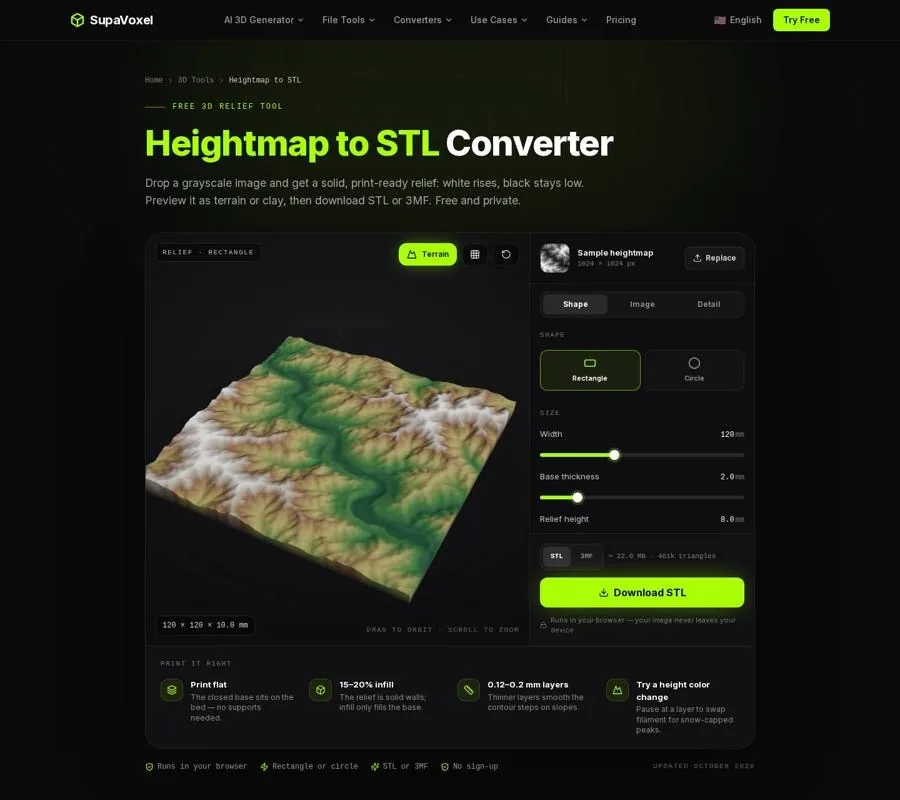
The heightmap workflow lets you shape a grayscale image into a relief with a printable base.
- Choose an image whose brightness can plausibly represent height. A terrain heightmap, depth map or grayscale graphic gives you more predictable contours than an unedited color photo. If you do use a photo, expect a stylized embossing, not a likeness with correct facial depth.
- Set the footprint and depth. Choose Rectangle or Circle, then set width, base thickness and relief height. The available width is 20–300 mm; the base starts at a 2 mm default and the relief height at 8 mm. Pure white reaches the full relief height above the base, while black stays at base level.
- Inspect the surface, not just the image. Crop to the subject and adjust contrast, gamma or smoothing. Noise and JPEG blocks can become tiny terraces. Use Invert if the source encodes near areas as dark rather than light, and inspect the preview before downloading STL or 3MF.
The converter exports a closed relief lying on its base. Print it that way: the base provides a flat contact surface, and the raised image does not need supports. For a photograph of the result, try side lighting. It makes changes in surface angle easier to see than evenly lit front light.
Compare both treatments before committing
When I am unsure which route suits a picture, I ask what information I want to preserve. A lithophane preserves the appearance of light and shade as a backlit image. A heightmap relief assigns those same shades a physical elevation. Neither interpretation is automatically right for every photograph.
Consider a landscape with a bright sky and dark trees. As a lithophane, the sky can transmit light while the trees form a darker silhouette. As a literal brightness-to-height relief, the bright sky rises above the dark trees. That may be a pleasing abstract surface, but it is not the landscape’s terrain. If you want actual hills and valleys, begin with a terrain heightmap rather than asking a photograph’s exposure to describe elevation.
The same test helps with portraits. If recognition depends on subtle tonal changes, favor the backlit panel. If the goal is a decorative, touchable interpretation, a relief can work, provided you accept that highlights become peaks. In either case, simplify the crop first. Removing distracting background gives the print’s limited physical detail a clearer job.
Print for the effect you chose
The slicer settings serve different purposes here. A lithophane needs a consistent path for light through the picture. If sparse infill crosses the image area, its pattern can show through instead of the intended tones. The page recommends making that area solid with 100% infill, or using at least 7 walls so infill falls only in the frame. Matte white PLA is a sensible starting material because colored or translucent filament can obscure detail. Tall upright panels can benefit from a 10–20 mm brim.
A relief needs a sound base and contours that do not disappear into coarse layers. The heightmap page suggests 0.12–0.2 mm layers and 15–20% infill for the base. Smoothing can reduce steps already present in the source image; finer print layers help with steps introduced as the slicer builds gentle slopes. Those solve different problems, so check both the preview and the sliced layers.
Finally, place each finished print where it can work. Hold a lithophane against a window or put a light behind it before deciding the image failed. Give a relief light from the side and look for shadows along its raised edges. Swapping those lighting setups is an easy way to make a sound print look disappointing.
When neither flat method fits
If you want a figurine or prop you can turn around, neither changing panel thickness nor raising pixels on a base will supply the hidden sides. SupaVoxel’s image to STL workflow predicts a full object from a picture; the unseen back is inferred, not measured. It is a different choice from preserving a photo as a panel, and any resulting STL still needs scaling in the slicer because STL does not carry real-world units.
For more control over the geometry, the image to 3D model Blender guide compares modeling over references, displacing an image into a relief, photogrammetry and importing an AI mesh. That distinction is useful if the finished object must be edited or animated: a printable relief and a mesh built for rigging are not the same deliverable.
FAQ
Can I make a lithophane lamp from the same photo I would use for a panel?
Yes. The lithophane maker offers both Lamp and Flat shapes. Preview the crop again after changing shape: a photograph that reads across a flat panel may need reframing when it wraps around a cylinder.
Why does my raised photo relief look unlike the subject?
The relief treats brightness as height, not as measured depth. Bright clothing, reflections and pale backgrounds rise regardless of where they sit in the scene. Use a prepared depth map for meaningful depth, or treat an ordinary photo relief as stylized embossing.
Should I choose STL or 3MF?
Both tools offer STL and 3MF. STL is a straightforward slicer choice, but it does not store units; 3MF stores them explicitly. Whichever you choose, check the model’s size and orientation in your slicer before printing.